Showing posts with label cupcake. Show all posts

Monday, 8 April 2013

Elegant Back and White wedding

On Saturday I had the pleasure of both styling and creating an amazing cake for Emma and Aaron's wedding. The brief was timeless elegance with the lovely heritage surroundings of Gipps Restaurant as the backdrop.

As Emma's stunning dress was a fitted lace creation reminiscent of the 1940's it was decided that a black and white classic clean look highlighted with deep red roses was the perfect plan.

So here are a few shots of the lovely tables.
black table runners, diamante scatters, wedding table centre pieces,black and white, red roses, monochromatic, sugarpie & honeycrumbs

wedding cake table display,tiered wedding cake, double height, sugarveil, black and white chevron, white sugar roses, monochromatic, sugarpie & honeycrumbs, edible pearls, red roses, rosemary, diamantes, buttercream rose cupcakes, black cake stands, upcycled

And then came the cake.
wedding cake table display,tiered wedding cake, double height, sugarveil, black and white chevron, white sugar roses, monochromatic, sugarpie & honeycrumbs, edible pearls, red roses, rosemary, diamantes, buttercream rose cupcakes, black cake stands, upcycled

The Centre piece cake was a 2 tier Raspberry and white chocolate mud cake with a double height top tier. Here are a few pics of the making of the cake. the top tier was wrapped in Sugarveil lace highlighted with edible pearls. The base tier was a black and white chevron pattern, gift box styles cake. The cake was topped with a floral bouquet replicating the look of the bridal and bridesmaids bouquets. White Sugar roses, rosemary sprigs, fresh red tea roses and diamantes created a dramatic top to the white cake.
tiered wedding cake, double height, sugarveil, black and white chevron, white sugar roses, monochromatic, sugarpie & honeycrumbs, edible pearls, red roses, rosemary, diamantes, buttercream rose cupcakes, black cake stands, upcycled

tiered wedding cake, double height, sugarveil, black and white chevron, white sugar roses, monochromatic, sugarpie & honeycrumbs, edible pearls, red roses, rosemary, diamantes

tiered wedding cake, double height, sugarveil, black and white chevron, white sugar roses, monochromatic, sugarpie & honeycrumbs, edible pearls, red roses, rosemary, diamantes

tiered wedding cake, double height, sugarveil, black and white chevron, white sugar roses, monochromatic, sugarpie & honeycrumbs

tiered wedding cake, double height, sugarveil, black and white chevron, white sugar roses, monochromatic, sugarpie & honeycrumbs
 The cake was surrounded by tiers of cupcakes featuring piped Butter cream roses.
buttercream piped roses cupcakes wedding

This was a cake of firsts for me - first chevron, first sugarveil and first piped roses! I am so in love with sugarveil and I can't wait to use it again!
Sugarveil lace doily mat
 
I wish Emma and Aaron all the best and a long and happy life together.
xoxo
Sugarpie.

Saturday, 23 March 2013

Kate & Matthew - a romantic black and white wedding.

When my lovely friend Vicki's daughter Kate and her fiance Matthew asked me to make their wedding cake I was thrilled. The beautiful couple had decided on a very romantic black and white theme and wanted a tower of 'gift boxes' to treat their guests to for dessert.Kate&Matt wedding cake, tiffany gift box, black and white, square cupcake, tier, bows, bling, sugarpie & honeycrumbs, Toowoomba, picnic point
Using one of my favourites - white chocolate and fresh raspberry mud cake I set about baking 120 individual cube cakes ( I love my Alan Silverwood Mini Square Pans), covering each one in white chocolate Italian Meringue Buttercream.
 
Kate&Matt wedding cake, tiffany gift box, black and white, square cupcake, tier, bows, bling, sugarpie & honeycrumbs, Toowoomba, picnic point

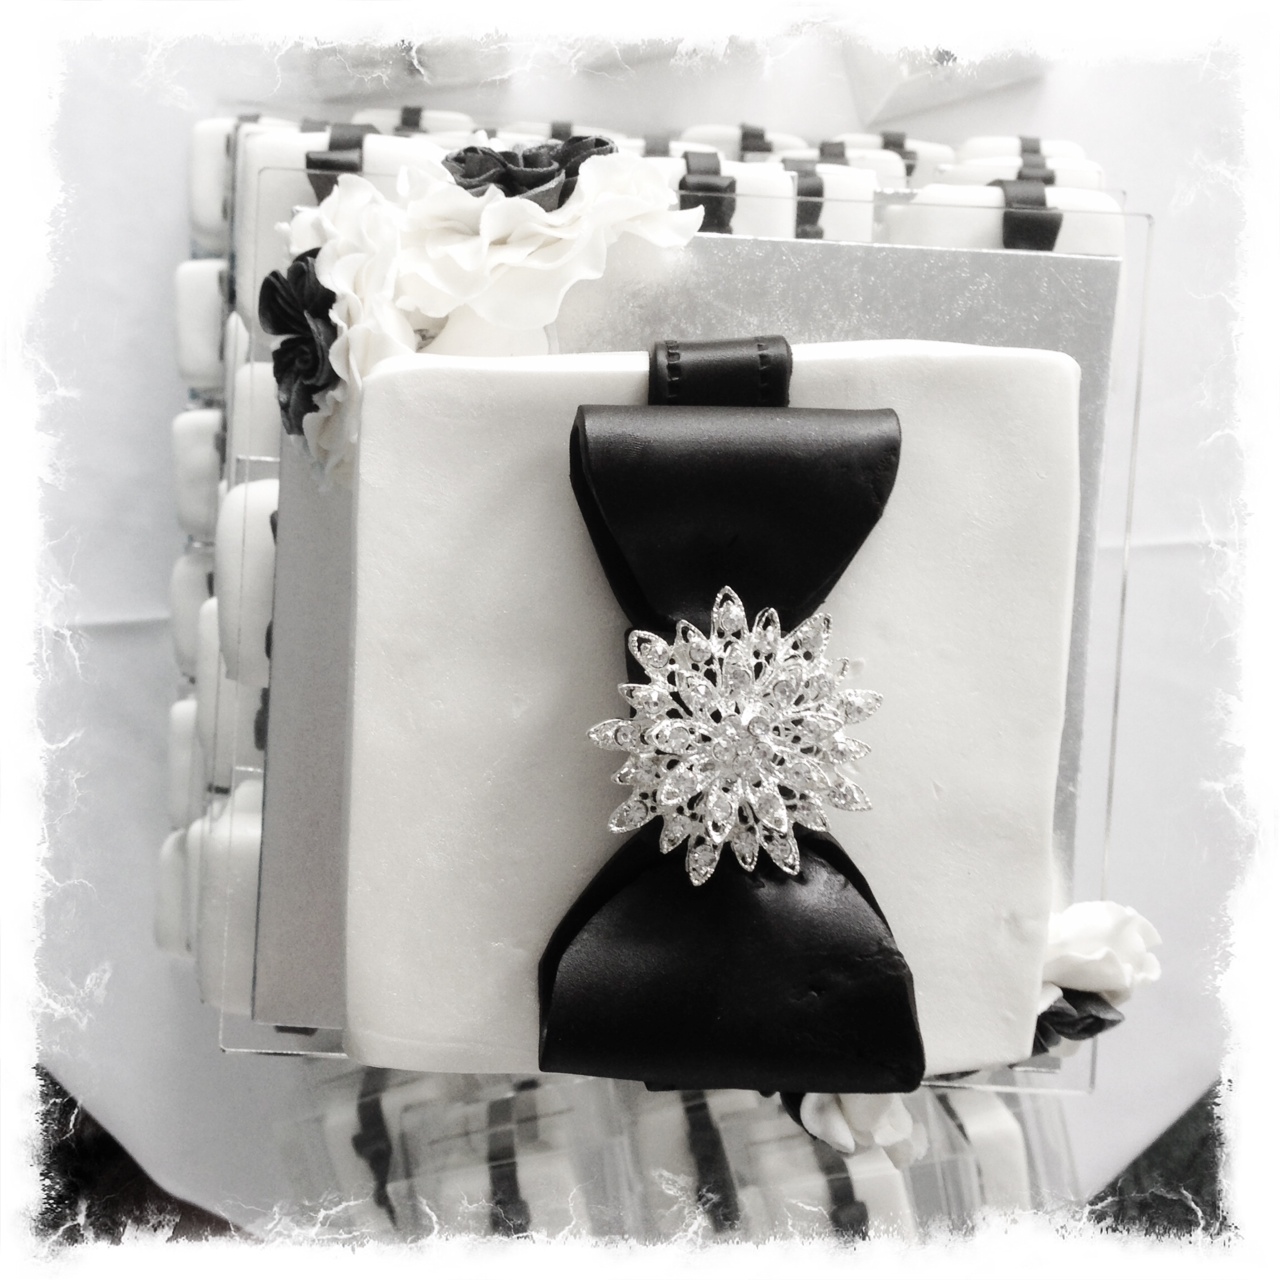
Each cake was then covered in antique white fondant and decorated with a black chocolate fondant band, bow and edible black diamante ( I buy mine from www.cakesaroundtown.com.au). The top tier was panelled with a 50/50 blend of white modelling chocolate and antique white fondant to give it more stability. The band and bow where ten added along with a pretty brooch centrepiece to match Kate's wedding bling.
 
Kate&Matt wedding cake, tiffany gift box, black and white, square cupcake, tier, bows, bling, sugarpie & honeycrumbs, Toowoomba, picnic point


And just a few pretty pictures in the function room at Picnic Point (such a lovely backdrop).
Kate&Matt wedding cake, tiffany gift box, black and white, square cupcake, tier, bows, bling, sugarpie & honeycrumbs, Toowoomba, picnic point

Kate&Matt wedding cake, tiffany gift box, black and white, square cupcake, tier, bows, bling, sugarpie & honeycrumbs, Toowoomba, picnic point

Kate&Matt wedding cake, tiffany gift box, black and white, square cupcakeKate&Matt wedding cake, tiffany gift box, black and white, square cupcake, tier, bows, bling, sugarpie & honeycrumbs, Toowoomba, picnic point, tier, bows, bling, sugarpie & honeycrumbs

Kate&Matt wedding cake, tiffany gift box, black and white, square cupcake, tier, bows, bling, sugarpie & honeycrumbs, Toowoomba, picnic point

Kate&Matt wedding cake, tiffany gift box, black and white, square cupcake, tier, bows, bling, sugarpie & honeycrumbs, Toowoomba, picnic point

Kate&Matt wedding cake, tiffany gift box, black and white, square cupcake, tier, bows, bling, sugarpie & honeycrumbs, Toowoomba, picnic point
A special thank you to my ever helpful hubby who very patiently sat and folded all the cake boxes!
Kate&Matt wedding cake, tiffany gift box, black and white, square cupcake, tier, bows, bling, sugarpie & honeycrumbs, Toowoomba, picnic point
 
More weddings to come in the next few weeks :-)
xoxo
Sugarpie


Monday, 25 February 2013

DIY Upcycled Wedding Cake Stands

After spending weeks looking for just the right black cake stands for an upcoming wedding I decided that the only way to get what I want was to make it myself. I looked over a number of great DIY blogs and videos and took tips from all of them and now I'll share the process with you.

After a quick trip (with my very patient husband) to Sam's Warehouse, Bunnings and Spotlight I came home with the materials to get started.
 From Sam's Warehouse I picked up two heavy glass candle holders and two ceramic bathroom vanity cups (toothbrush holders) spending a massive $7.50. I wanted two different heights to add visual impact to the wedding display. I will be making a 5th stand this weekend that is higher still.
 Then it was a walk across to Spotlight to pick up some dinner plates. I love a good sale and these heavy plates were 40% off so again it was a grand total of $22.00. I decided to stick with the pairs thing but allow a little variation. By selecting two plain and two scalloped plates I could create 4 stands that were each different but still looked like they all belonged together.
A little drive across town to Bunnings to pick up Black Gloss Spray Paint and a bottle of glue. Luckily hubby is a bit of a DIY guru and found the perfect glue. Total spend $24.00
  After a wash and dry of all the parts I set them out on his work bench and let him do the messy glue work (unfortunately the adhesive smell gives me migraines so luckily he is always willing to help). I wanted the stands to sit flat on the table so we checked which was the best way to set them - the candle holders needed to be upside down and the cups right side up.
 After allowing the glue to cure for the full 12 hours they were ready to paint. Because the plates and ceramic cups matched, if I wanted cool white they would be ready to go.
 Two coats of black gloss to underside, then when dry we flipped them and gave the top two coats. and here they are...... for a grand total of $53.50 ( that's a tiny $13.37 each) I have 4 custom black cake stands.

Oh and thanks to my lovely friend (and cake pop addict) Jess who made me the crotchet 'Tart'.
You'll see the final display in April after the beautiful Emma and Aaron's wedding.

xoxo
Sugarpie.


Sunday, 5 August 2012

Totally girly Pink 'High Tea' tower

I have to say so this is now one of my fave cakes ever. In fact I want someone to make me a teapot tower all for myself. The request was for a pretty cake for a 17 year old's high tea birthday party, so what better than a Pink spotty teapot ringed with ultra girly cupcakes in pretty shades of pinks, blues and whites.

thanks to my hubby for the photography :-)

So we started off with a ball cake of layered pink and vanilla butter cake with rosy pink bubble gum butter cream.....
3D sports ball pan, layers of pink and vanilla butter cake, bubble gum butter cream
While the butter cream was crusting over (important before adding fondant or it gets rather messy) I layered the base board 'doily' with white fondant. It was then imprinted with one of my scrap booking rubber background stamps (yep multi purpose items are awesome) then brushed with silver pearl lustre dust. I wish you could see the awesome shimmer on these cakes....
8inch cake board with white fondant, stamped impression and silver lustre dust
The teapot came next. I rolled and shaped the handle and spout and left them in a bed of cornflour overnight to harden and they were attached in the morning with a dab of melted white chocolate. The teapot itself is covered in bright pink fondant with baby pink spots and white hearts. The 'Lid' was made with a Karen Davies Vintage Brooch Mould from Cakes Around Town - the same mould set was used on the bow cupcakes. Pale pink lustre dust was then used sparingly to give the whole teapot a slight shimmer.
Rosy pink teapot with spots and hearts
It was then time to build the cupcakes that surround the stand (and thank you to my handy man hubby for making the custom sized stand for me xoxo).
All the cupcakes are delicious Vanilla with a thin bubblegum butter cream layer beneath a fondant top.
 First up were the fondant bows and brooches. The broaches were dusted with lustre dust to create a pretty pearled finish.

vanilla cupcake, fondant bow, fondant brooch
 Then a cute little heart and circle motif to match the teapot.

vanilla cupcake, organza ribbon, hearts and circles.
 The next set have an impressed fondant top created with the same stamp used for the doily base. Again a brushing of lustre dusts raises the print and a cute flower highlight mimicking the flower shapes in the imprint.


stamp impressed fondant, lustre dust, plunger cut flowers, yellow sugar pearls

 Last of all my favourite of the bunch - the chocolate pearl centred ruffle flower. This is just to pretty and girly and just about sums me up perfectly!

vanilla cupcake, ruffle flower with chocolate pearl centre, butterfly cake wrap
So the lower tiers of cup cakes come together in pretty and very girly celebration....
the delectable lower tiers
Put it all together and this is the stunning result.....enjoy a cuppa, or two.

the perfect High Tea tower.
 Next week......'Jeepers' the Moshi Monster tiger and a cake perfect for a little horse loving girl.

XOXO


Tuesday, 24 July 2012

the start of a busy month and a blast from the past

So the next 4 weeks are going to be a bit busy. As well as my normal job i have a few cakes and treats on the books but my reward in the end is a visit to the family in Rocky and then an awesome girls weekend down the coast.
So what's coming up in the kitchen over the next few weeks? This week a set of sweet treats for a Saturday High Tea style tasting for the girls from the lovely Miss Karen's bridal party with the mothers. They will be tasting the treats Karen has selected for her vintage style Sweets Buffet at her up coming wedding.
Then next week I have another High Tea themed cake, this time a pretty pink teapot with a selection of pretty cup cakes. I picked up the most amazing fondant mould shaped like vintage brooches (the kind your grandmother had on her dressing table) to create very girly cup cake toppers from Cakes Around Town. These ladies have some the most tempting moulds I have seen! They will be all displayed on a one of a kind cup cake stand that hubby is kindly helping me build.
A couple of days later I have a very very funky and fun Moshi Monster 'Jeepers' cake - cute little tiger - to make. After that it is straight on to sweet horse themed cake - looking forward to hand modelling  a cute sugar pony. The craziness is then rounded out by a very special cake for a very special ladies 65th birthday. Shhhh can't tell you much but I can say that it features lots of modelling, lots of hand painting, some beautiful sugar flowers and a generous splash of vintage nostalgia.

But while I have day off and am able to collect my thoughts, let me share with you an old friend. This was one of the first cakes I did to set my business in motion. A cute giant cupcake for my friend Leila's gorgeous little girls.


this sweet cake was a chocolate and vanilla cake with coloured fondant 'cup' and 'icing' topped with chocolate modelling fondant drizzle, pretty butterflies and sprinkles.

 The butterfly's were set to dry on cardboard to give them that floating look and the cute cherry is from red fondant.  Marbled fondant made a great  cover for the cake board.

Went down well at fun party in the park - everyone wanted a butterfly.

xoxo

Tuesday, 10 July 2012

Getting Started

Slowly getting started with adding the littel bits and pieces to the blog. This first featured cake was created for Olivia's 7th birthday. She asked for a Moshi Monster cake of her favourite MM Cuteipie.
This is the original image of Cutiepie.

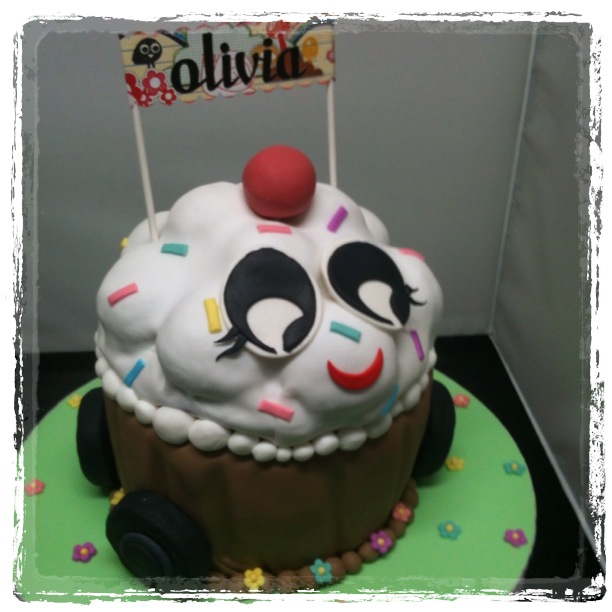
The cake itself was a swirled confection of Pink an dpirple vanilla cake with a lush pink bubblegum buttercream. trimmed then coated on a vanilla butter cream and white chocolate ganache she was then coated with a chocolate fondant for the base.
To create the bubbled top cakepop halves were pressed onto a dome shae then lightly buttercreamed and layered with white fondant.
Wheels were created by wrapping mini wagon wheels in black fondant with 'white wall' tyre centres.
Eyes, mouth and sprinkles were cut from coloured fondant and a bright red dipped cakepop 'cherry' was inserted in the top.
A cute sign finished off the look.

Delivering the cake was a great deal of fun, as we stepped up to the front door we were greated with squeals of 'That's my cake' from the very excited birthday girl.
A winner all round I think.

XOXO