Showing posts with label chocolate modelling paste. Show all posts

Saturday, 23 March 2013

Beautiful Blue Bird Cake Pop Tutorial

I adore these cute little birds which sold out quite fast at the Queens Park Handmade Markets last weekend. Thought I might share the process with you.
modelling chocolate, chefmaster blue candy colour, wings, petal veiner, cake pop, bluebird, flower
You will need:
  • Crumbled cake
  • Buttercream
  • Melted White Chocolate coloured you favourite bird colour (I used ChefMaster Blue Candy Colour)
  • White modelling chocolate
  • Gel/Candy colours (I used ChefMaster Candy Colours -  Pink, Yellow and Blue)
  • Small Black Sugar Pearls
  • Heart or Blossom cutter
  • Small Petal or Tear shaped cutter
  • Petal Veiner or toothpick
  • Paper Lolly sticks

Using a nice dense cake (I used chocolate mud with honeycomb crumble) and not too much buttercream, shape your small balls of cake (about 30g) into a tear drop shape bending the 'tail' up slightly. Chill then attach to your sticks with a little melted chocolate in the colour you will use for the body. Put aside to chill while you make your bits and pieces.
modelling chocolate, chefmaster blue candy colour, wings, petal veiner, cake pop, bluebird, flower

 To prepare the wings, beak and heart you will need white modelling chocolate. Never used it before? Visit www.craftsy.com and see some of their great tutorials or search www.youtube.com where you can find plenty of free videos. I plan to add some modelling chocolate tutorials to my blog at a later time so stay tuned.

Colour a small amount yellow (if you don't have the right candy colours you can use normal gel colours to tint the modelling chocolate, I would not recommend liquid colours as they make the chocolate too sticky), a small amount pink and a medium amount the same colour as your melted chocolate you have chosen for the body.

How much is a small amount? When I make 50 pops I use a piece the size of a ping pong ball for the beak and hearts - this will give you enough to play with. For the wings I use a tennis ball sized amount.

Rolling the chocolate is easiest done on a silicone matt. If you find it sticks use just the smallest amount of copha (Crisco in the US) on your hands and the mat.

For the beaks pinch off pea sized amounts of yellow and roll between your fingers to make a small cone. Put them aside to firm up as the temperature of your hands will make the chocolate soft.

Roll out the pink and use a small heart cutter (or a flower if you don't have a heart shape) to cut one for each bird.

Roll out the blue and use a small petal or tear drop shape - 2 for each bird. I then used a magnolia/lily petal veiner to get the feathered look. If you don't have access to a veiner you can use the tines of a small fork or a tooth pick dragged gently from the rounded end to the point to get a similar texture.

modelling chocolate, chefmaster blue candy colour, wings, petal veiner, cake pop, bluebird, flower

Then comes the fun part! Dip your bird in the melted chocolate and carefully shake off the excess. While the chocolate is soft add the beak and eyes to the rounded 'face' end.

modelling chocolate, chefmaster blue candy colour, wings, petal veiner, cake pop, bluebird, flower
Use a toothpick to pick up a small amount of melted chocolate and attach the wings to either side of the body. Place the wings rounded end forward and bend the pointed end of the wing out slightly away from the body
modelling chocolate, chefmaster blue candy colour, wings, petal veiner, cake pop, bluebird, flower
Use another small dot of chocolate to attach the heart to the back of the bird.
 
modelling chocolate, chefmaster blue candy colour, wings, petal veiner, cake pop, bluebird, flower
And there you have a flock of pretty birds ready for any type of celebration.

Have a few 'wings' left over.........just add a beak....
modelling chocolate, chefmaster blue candy colour, wings, petal veiner, cake pop, bluebird, flower

Hope you have as much fun making these feathered friends as I do!

xoxo
Sugarpie.

Kate & Matthew - a romantic black and white wedding.

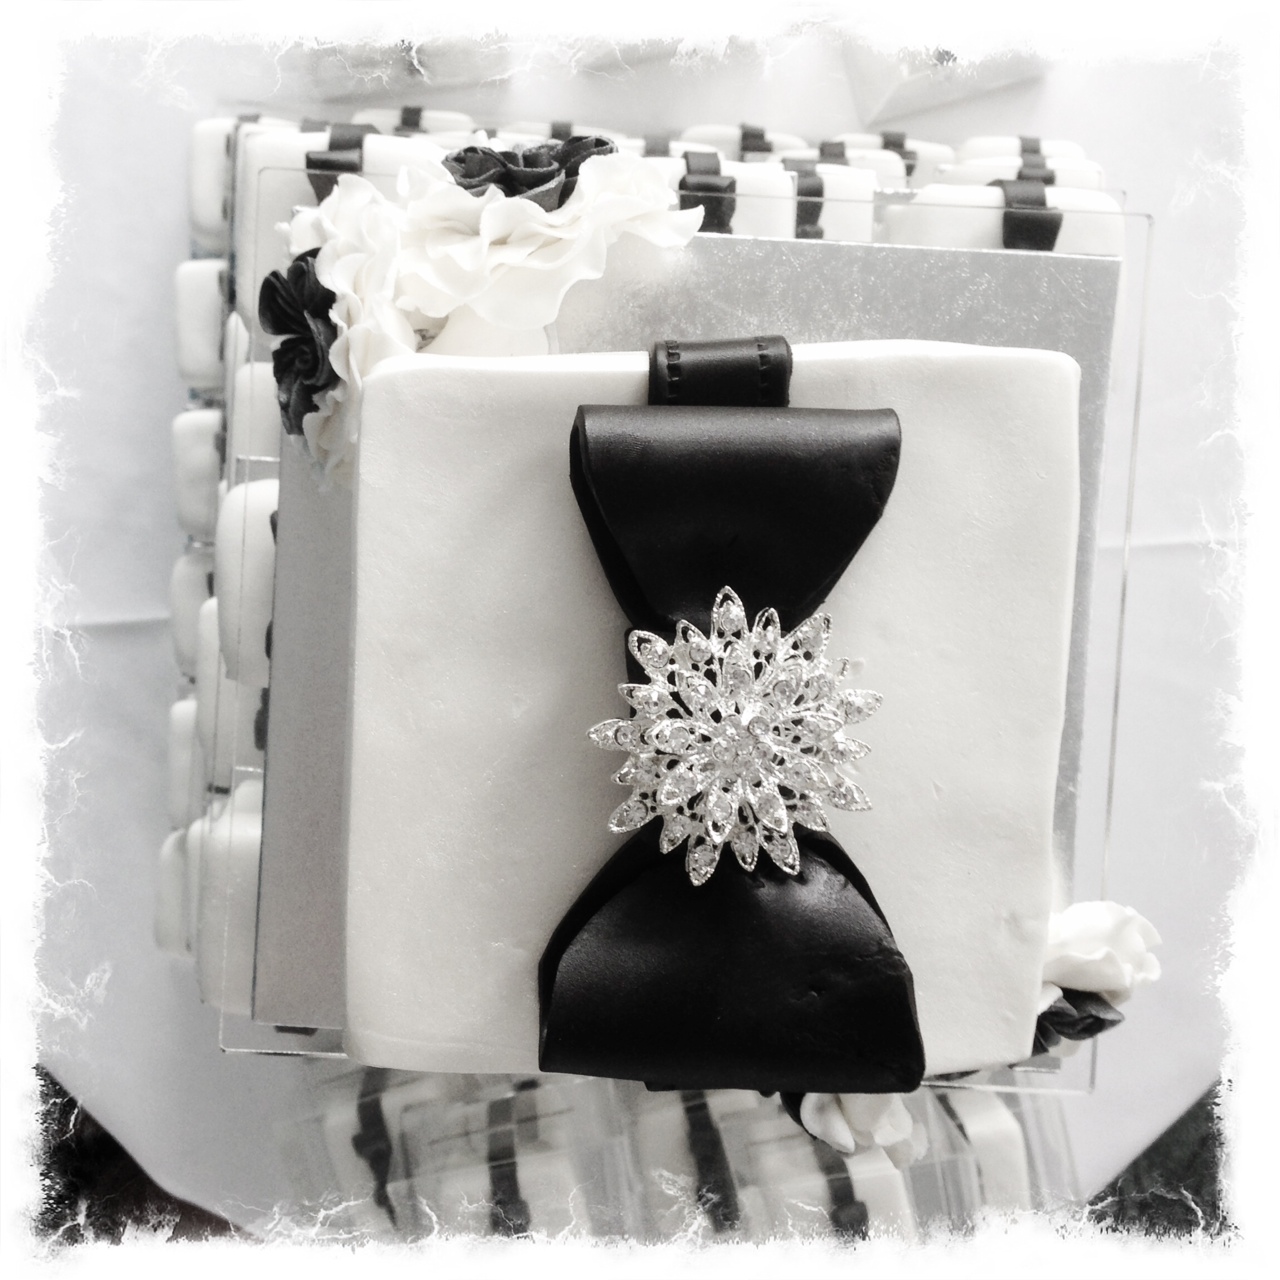
When my lovely friend Vicki's daughter Kate and her fiance Matthew asked me to make their wedding cake I was thrilled. The beautiful couple had decided on a very romantic black and white theme and wanted a tower of 'gift boxes' to treat their guests to for dessert.Kate&Matt wedding cake, tiffany gift box, black and white, square cupcake, tier, bows, bling, sugarpie & honeycrumbs, Toowoomba, picnic point
Using one of my favourites - white chocolate and fresh raspberry mud cake I set about baking 120 individual cube cakes ( I love my Alan Silverwood Mini Square Pans), covering each one in white chocolate Italian Meringue Buttercream.
 
Kate&Matt wedding cake, tiffany gift box, black and white, square cupcake, tier, bows, bling, sugarpie & honeycrumbs, Toowoomba, picnic point

Each cake was then covered in antique white fondant and decorated with a black chocolate fondant band, bow and edible black diamante ( I buy mine from www.cakesaroundtown.com.au). The top tier was panelled with a 50/50 blend of white modelling chocolate and antique white fondant to give it more stability. The band and bow where ten added along with a pretty brooch centrepiece to match Kate's wedding bling.
 
Kate&Matt wedding cake, tiffany gift box, black and white, square cupcake, tier, bows, bling, sugarpie & honeycrumbs, Toowoomba, picnic point


And just a few pretty pictures in the function room at Picnic Point (such a lovely backdrop).
Kate&Matt wedding cake, tiffany gift box, black and white, square cupcake, tier, bows, bling, sugarpie & honeycrumbs, Toowoomba, picnic point

Kate&Matt wedding cake, tiffany gift box, black and white, square cupcake, tier, bows, bling, sugarpie & honeycrumbs, Toowoomba, picnic point

Kate&Matt wedding cake, tiffany gift box, black and white, square cupcakeKate&Matt wedding cake, tiffany gift box, black and white, square cupcake, tier, bows, bling, sugarpie & honeycrumbs, Toowoomba, picnic point, tier, bows, bling, sugarpie & honeycrumbs

Kate&Matt wedding cake, tiffany gift box, black and white, square cupcake, tier, bows, bling, sugarpie & honeycrumbs, Toowoomba, picnic point

Kate&Matt wedding cake, tiffany gift box, black and white, square cupcake, tier, bows, bling, sugarpie & honeycrumbs, Toowoomba, picnic point

Kate&Matt wedding cake, tiffany gift box, black and white, square cupcake, tier, bows, bling, sugarpie & honeycrumbs, Toowoomba, picnic point
A special thank you to my ever helpful hubby who very patiently sat and folded all the cake boxes!
Kate&Matt wedding cake, tiffany gift box, black and white, square cupcake, tier, bows, bling, sugarpie & honeycrumbs, Toowoomba, picnic point
 
More weddings to come in the next few weeks :-)
xoxo
Sugarpie


Tuesday, 12 February 2013

Homerlicious Maple Cinnamon Pancake Pops.

So this week is my second Handmade Markets and I'm really excited. Last month I almost sold out and it was a quiet day. I am really hoping for a ripper of a day on Sunday. To get there I have been working on new and fun pops to sell and I have to say this is my favourite so far.

Sugarpie & Honeycrumbs maple cinnamon donut pancake stack white modelling chocolate barco chocolate brown powder cakepop

Mould your chosen cake/butter cream combination (I've used  cinnamon sponge with maple syrup butter cream) into small discs. Stack then with a little melted choc between before carefully inserting a paper lolly stick.
Sugarpie & Honeycrumbs maple cinnamon donut pancake stack white modelling chocolate barco chocolate brown powder cakepop

Once they have set, dip them carefully in your melted pancake coloured chocolate. I added a small amount of paramount crystals (you can use copha instead) to thin the chocolate to allow it to ease into all the gaps between your pancakes. Allow chocolate to set.

 Using a brown petal dust (I have used Barco Dark Brown) and a flat sided medium bristle brush catch the ridges to give you pancakes a crispy cooked edge.
Sugarpie & Honeycrumbs maple cinnamon donut pancake stack white modelling chocolate barco chocolate brown powder cakepop
 Melt some white chocolate and colour yellow with candy colour. At the same time colour some white modelling chocolate to match. Roll the modelling chocolate into little 'butterpats', two for each pop. Drizzle a small spoon of yellow chocolate in top, teasing it down the sides in delicious buttery dribbles and position the butter pats on top.
Sugarpie & Honeycrumbs maple cinnamon donut pancake stack white modelling chocolate barco chocolate brown powder cakepop

Let them set completely then watch them all disappear.

Happy popping!
xoxo
Sugarpie


Saturday, 18 August 2012

chocoholics dream birthday trio

Last night we joined in the celebrations for our lovely friend Vicki's 60th birthday and what better way to celebrate such a wonderful lady than with a trio of her favourite chocolates. My original plan for a tea set cake sadly did not come to pass this time (very wet air in Toowoomba and a change of job at work put me on the back foot) but I do plan to go back to it at some point.
So anyway birthday cake phase two took shape as a cake version of three of Vicki's favourite chocolates.

Cake 1 - Chocolate Seashell.
Based on the Guylian Chocolate seashells with the praline ganache filling .... very yum. So I made the hazelnut praline to begin with, I have  half a jam jar full of the remaining nutty sugary powder, delish sprinkled on ice-cream.

I then filled a chocolate mudcake shell with delish mousse that had been gently mixed through with chocolate ganache and the blended praline.

I then added a layer of cake to the top and encased the whole thing in chocolate ganache. The whole cake was then swathed in a layer of marbled chocolate fondant. Colour and texture was added with modelling tools and chocolate brown, snow white and gold Barco dusts.
Finished off with a pair of red roses lightly brushed with gold lustre dust.

Cake 2 Strawberry Mousse Cup
This one was inspired by the Godiva Strawberry Trifle Cup. The base was a layer of Genoise Sponge moistened with Strawberry liquer. A delicious layer of French jelly (made with real strawberries of course) was topped with a very generous layer of strawberry mousse....I've even shared my recipe at the bottom of this post :-)
A sweeping of white chocolate ganache, some gold dusted chocolate panels and a trio of roses finished the cake. Sadly it was all eaten before I could snap a picture of the pretty layers.

Cake (well cake pops) 3 - the Lindt Chocolate Balls
Who doesn't love Lindt chocolate? A serious amount of Lindt went in to these divine little gold leafed treasures. With hearts of chocolate mud cake combined with Lindt Ganache and a splash of chocolate port, these little beauties where then dipped in dark lindt chocolate and the gold leaf was brushed on to the warm surface. Yummmmmm.

So together they made a very pretty and decadent dessert trio..........a perfect happy birthday.
And as promised, here is my recipe for the delicious strawberry mousse cake layer. Makes a wonderful dessert with the addition of some fresh berries and biscuit to garnish.

Strawberry Mousse
Puree 2 cups of fresh strawberries in the blender. Add 3/4 cup sugar and 1 tbsp fresh lemon juice.
In a small bowl glass bowl, sprinkle 1 sachet (1 tbsp) unflavoured gelatin over 1/3 cup cold water and leave to sit for a few minutes. Place the bowl over a pan of simmering water and stir until disolved. Remove from the heat as soon as the gelatin has disolved.
Stir the gelatin into the strawberry puree and allow to thicken for about 10 minutes. In a large bowl  whip 2 cups of cream until medium stiff peaks.
Gently fold half the cream into the strawberry then fold the strawberry cream into the remaining cream gently with a rubber spatula.
Chill for minimum 30 minutes then spoon in to glasses.
To use in a cake, chill overnight tightly covered with cling wrap.
Enjoy.

XOXO

Tuesday, 24 July 2012

the start of a busy month and a blast from the past

So the next 4 weeks are going to be a bit busy. As well as my normal job i have a few cakes and treats on the books but my reward in the end is a visit to the family in Rocky and then an awesome girls weekend down the coast.
So what's coming up in the kitchen over the next few weeks? This week a set of sweet treats for a Saturday High Tea style tasting for the girls from the lovely Miss Karen's bridal party with the mothers. They will be tasting the treats Karen has selected for her vintage style Sweets Buffet at her up coming wedding.
Then next week I have another High Tea themed cake, this time a pretty pink teapot with a selection of pretty cup cakes. I picked up the most amazing fondant mould shaped like vintage brooches (the kind your grandmother had on her dressing table) to create very girly cup cake toppers from Cakes Around Town. These ladies have some the most tempting moulds I have seen! They will be all displayed on a one of a kind cup cake stand that hubby is kindly helping me build.
A couple of days later I have a very very funky and fun Moshi Monster 'Jeepers' cake - cute little tiger - to make. After that it is straight on to sweet horse themed cake - looking forward to hand modelling  a cute sugar pony. The craziness is then rounded out by a very special cake for a very special ladies 65th birthday. Shhhh can't tell you much but I can say that it features lots of modelling, lots of hand painting, some beautiful sugar flowers and a generous splash of vintage nostalgia.

But while I have day off and am able to collect my thoughts, let me share with you an old friend. This was one of the first cakes I did to set my business in motion. A cute giant cupcake for my friend Leila's gorgeous little girls.


this sweet cake was a chocolate and vanilla cake with coloured fondant 'cup' and 'icing' topped with chocolate modelling fondant drizzle, pretty butterflies and sprinkles.

 The butterfly's were set to dry on cardboard to give them that floating look and the cute cherry is from red fondant.  Marbled fondant made a great  cover for the cake board.

Went down well at fun party in the park - everyone wanted a butterfly.

xoxo

Wednesday, 18 July 2012

One cool Monkey....

When Jess (huge Macaron and Cake pop fan) asked if I could make a monkey cake for her partner Corey's (Corz) birthday my thoughts ran straight to the Paul Frank monkey faces. Corz is a huge music fan so it seemed natural that his monkey should be rockin' a huge pair of retro inspired headphones.
So here is what we did.

 Our Monkey, lets call him Charlie, started with a chocolate cake base filled with a delicious thick cookies and cream butter cream. top that with a layer of chunky crushed Oreo cookies then do it all over again.
 Two cakes were used to create Charlies face, the top carved for the upper head. Both were covered in rich choc ganache then covered with a light and dark chocolate fondant. His awesome red headphones where black fondant covered donuts (yumm) and shaped fondant band.
Charlie looks pretty happy chillin' on his blue cake board don't you think.

Hope you had an awesome birthday Corz.....look forward to next year  - I hear you have a huge challenge for next time Jess. Bring it on!

xoxo

Tuesday, 10 July 2012

Getting Started

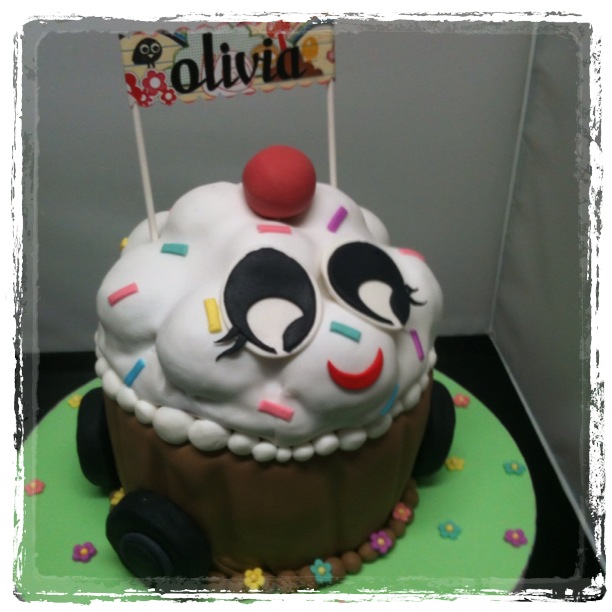
Slowly getting started with adding the littel bits and pieces to the blog. This first featured cake was created for Olivia's 7th birthday. She asked for a Moshi Monster cake of her favourite MM Cuteipie.
This is the original image of Cutiepie.

The cake itself was a swirled confection of Pink an dpirple vanilla cake with a lush pink bubblegum buttercream. trimmed then coated on a vanilla butter cream and white chocolate ganache she was then coated with a chocolate fondant for the base.
To create the bubbled top cakepop halves were pressed onto a dome shae then lightly buttercreamed and layered with white fondant.
Wheels were created by wrapping mini wagon wheels in black fondant with 'white wall' tyre centres.
Eyes, mouth and sprinkles were cut from coloured fondant and a bright red dipped cakepop 'cherry' was inserted in the top.
A cute sign finished off the look.

Delivering the cake was a great deal of fun, as we stepped up to the front door we were greated with squeals of 'That's my cake' from the very excited birthday girl.
A winner all round I think.

XOXO