Monday, 25 February 2013

DIY Upcycled Wedding Cake Stands

After spending weeks looking for just the right black cake stands for an upcoming wedding I decided that the only way to get what I want was to make it myself. I looked over a number of great DIY blogs and videos and took tips from all of them and now I'll share the process with you.

After a quick trip (with my very patient husband) to Sam's Warehouse, Bunnings and Spotlight I came home with the materials to get started.
 From Sam's Warehouse I picked up two heavy glass candle holders and two ceramic bathroom vanity cups (toothbrush holders) spending a massive $7.50. I wanted two different heights to add visual impact to the wedding display. I will be making a 5th stand this weekend that is higher still.
 Then it was a walk across to Spotlight to pick up some dinner plates. I love a good sale and these heavy plates were 40% off so again it was a grand total of $22.00. I decided to stick with the pairs thing but allow a little variation. By selecting two plain and two scalloped plates I could create 4 stands that were each different but still looked like they all belonged together.
A little drive across town to Bunnings to pick up Black Gloss Spray Paint and a bottle of glue. Luckily hubby is a bit of a DIY guru and found the perfect glue. Total spend $24.00
  After a wash and dry of all the parts I set them out on his work bench and let him do the messy glue work (unfortunately the adhesive smell gives me migraines so luckily he is always willing to help). I wanted the stands to sit flat on the table so we checked which was the best way to set them - the candle holders needed to be upside down and the cups right side up.
 After allowing the glue to cure for the full 12 hours they were ready to paint. Because the plates and ceramic cups matched, if I wanted cool white they would be ready to go.
 Two coats of black gloss to underside, then when dry we flipped them and gave the top two coats. and here they are...... for a grand total of $53.50 ( that's a tiny $13.37 each) I have 4 custom black cake stands.

Oh and thanks to my lovely friend (and cake pop addict) Jess who made me the crotchet 'Tart'.
You'll see the final display in April after the beautiful Emma and Aaron's wedding.

xoxo
Sugarpie.


Tuesday, 12 February 2013

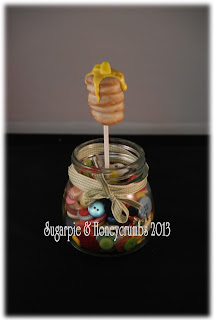
Homerlicious Maple Cinnamon Pancake Pops.

So this week is my second Handmade Markets and I'm really excited. Last month I almost sold out and it was a quiet day. I am really hoping for a ripper of a day on Sunday. To get there I have been working on new and fun pops to sell and I have to say this is my favourite so far.

Sugarpie & Honeycrumbs maple cinnamon donut pancake stack white modelling chocolate barco chocolate brown powder cakepop

Mould your chosen cake/butter cream combination (I've used  cinnamon sponge with maple syrup butter cream) into small discs. Stack then with a little melted choc between before carefully inserting a paper lolly stick.
Sugarpie & Honeycrumbs maple cinnamon donut pancake stack white modelling chocolate barco chocolate brown powder cakepop

Once they have set, dip them carefully in your melted pancake coloured chocolate. I added a small amount of paramount crystals (you can use copha instead) to thin the chocolate to allow it to ease into all the gaps between your pancakes. Allow chocolate to set.

 Using a brown petal dust (I have used Barco Dark Brown) and a flat sided medium bristle brush catch the ridges to give you pancakes a crispy cooked edge.
Sugarpie & Honeycrumbs maple cinnamon donut pancake stack white modelling chocolate barco chocolate brown powder cakepop
 Melt some white chocolate and colour yellow with candy colour. At the same time colour some white modelling chocolate to match. Roll the modelling chocolate into little 'butterpats', two for each pop. Drizzle a small spoon of yellow chocolate in top, teasing it down the sides in delicious buttery dribbles and position the butter pats on top.
Sugarpie & Honeycrumbs maple cinnamon donut pancake stack white modelling chocolate barco chocolate brown powder cakepop

Let them set completely then watch them all disappear.

Happy popping!
xoxo
Sugarpie


Friday, 1 February 2013

Kates white chocolate fantasy cake

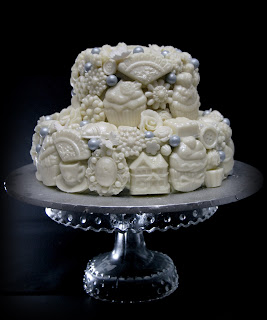
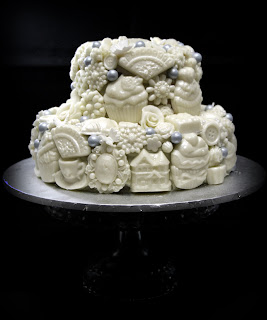
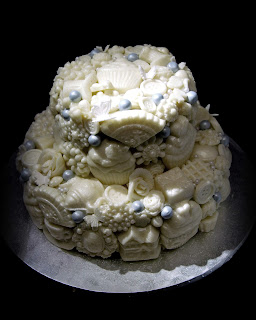
So I am a huge fan of the incredible creations by English cakes artists at Choccywoccydoodah. They create the most incredible chocolate covered fantasy cakes you have every seen (please click on the link and check them out). I was looking for the opportunity to put my own spin on the chunky decorating style so when Vicki asked me to create a special cake for her daughter Kate's birthday I knew exactly what I was going to do.

The base of the cake is a white choc and raspberry mud cake with a layer of white chocolate ganache. All the decorations are white chocolate modelling paste. It's so easy to make your own... melt 1kg of white chocolate (good quality) in a glass bowl and add 250ml of light corn syrup (glucose). Mix for approximately 20 turns (too much will turn your choc grainy and oily) you should see all the streaks of chocolate disappear. Turn out onto a piece of cling wrap, wrap tight and refrigerate for 24 hours.

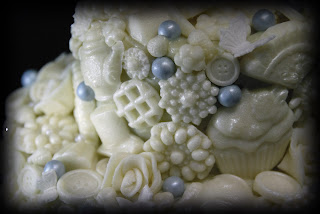
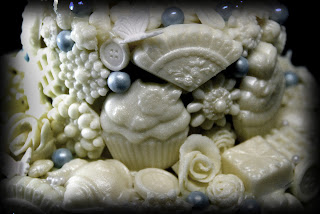
I used lots of chocolate moulds and silicone moulds to create all the individual pieces and then pressed them on to the cake until it was all covered. I added some blue pearl sixlets (chocolate filled candy pearls), small white pearls and some fondant butterflies and this is what happened....
white chocolate modelling paste moulded fantasy cake sugarpie&honeycrumbs

white chocolate modelling paste moulded fantasy cake sugarpie&honeycrumbs

white chocolate modelling paste moulded fantasy cake sugarpie&honeycrumbs

white chocolate modelling paste moulded fantasy cake sugarpie&honeycrumbs

white chocolate modelling paste moulded fantasy cake sugarpie&honeycrumbs

white chocolate modelling paste moulded fantasy cake sugarpie&honeycrumbs

white chocolate modelling paste moulded fantasy cake sugarpie&honeycrumbs
Happy birthday Kate.

xoxo
Sugarpie.